
The single biggest factor in whether a custom shirt actually fits you is not the fabric, the collar style, or the brand you order from, it’s the accuracy of the measurements you submit. Get them right, and a made-to-measure shirt will sit closer to your body and feel noticeably different from anything off a store rack. Get them wrong by even an inch, and you can end up with the same fit problems you were trying to avoid in the first place.
The good news is that learning how to measure shirt size at home takes about ten minutes, a tape measure, and one other person to help. This guide walks through exactly what to measure, how to measure it correctly, and the mistakes that trip people up most often, so your first custom shirt order fits the way it’s supposed to.
What You’ll Need Before You Start
- A flexible fabric or vinyl tape measure, not a rigid metal one, which won’t wrap around the body accurately.
- A well-fitting dress shirt you already own (optional, but useful as a cross-check).
- A friend or family member to help. Self-measuring works for some steps, but shoulder width and back length are almost impossible to get accurately by yourself.
- A mirror, so you can confirm the tape is level and sitting where it should.
- About 10–15 minutes, ideally wearing a thin, well-fitting shirt (like a plain t-shirt) rather than a bulky sweater.
Before You Begin: A Few Ground Rules
A handful of small habits make the difference between measurements you can trust and measurements that quietly throw off your entire order:
- Stand naturally, with your normal posture. Don’t puff your chest out or suck your stomach in, the shirt has to fit you standing, sitting, and moving normally, not in a held pose.
- Breathe normally while the tape is being placed. Measuring right after a deep inhale will make your chest and waist numbers larger than they really are.
- Keep the tape snug against the body, but not pulled tight enough to compress the skin or fabric underneath. A good rule of thumb: you should be able to slide one finger flat between the tape and your body.
- Measure twice for every number. If the two readings don’t match within about half a centimetre (roughly a quarter inch), measure a third time and use the middle value.
- Record every measurement in the same unit (centimetres or inches), don’t mix units partway through, since that’s a common source of order errors.
Step-by-Step: The Core Shirt Measurements
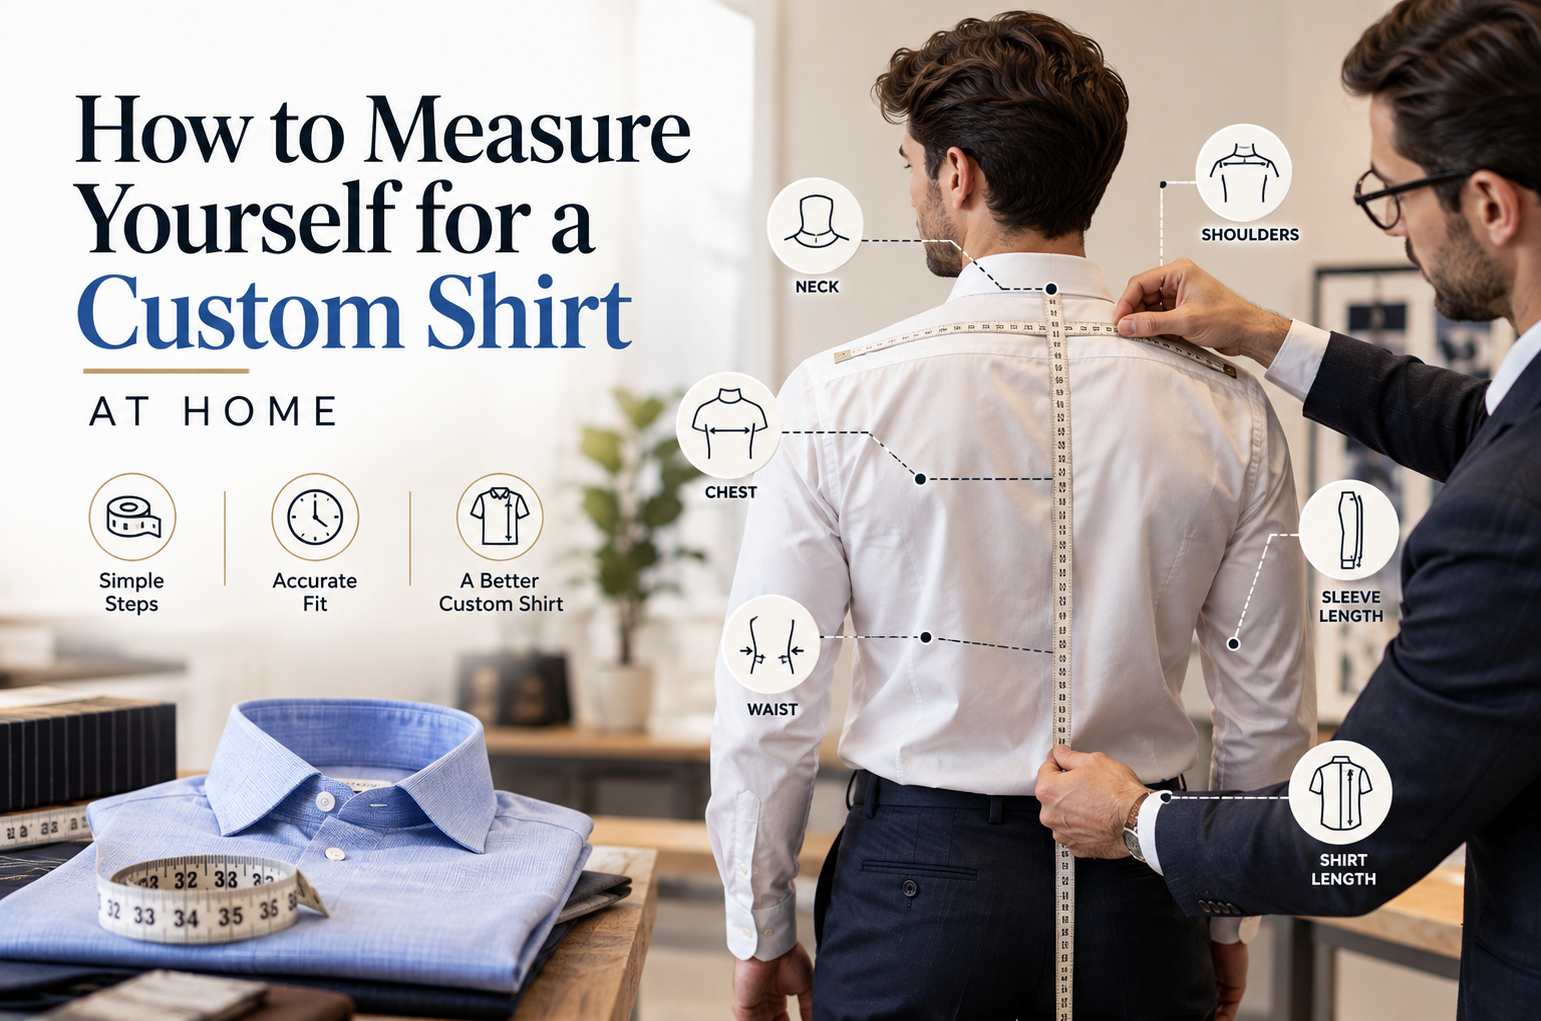
1. Neck
Wrap the tape around the base of your neck, at the point where a shirt collar would naturally sit, roughly where your neck meets your shoulders, just above the collarbone. Keep one finger between the tape and your neck for a comfortable-but-accurate reading, since a collar measured too tight will feel restrictive all day.
2. Chest
Wrap the tape around the fullest part of your chest, going under your arms and across your shoulder blades, keeping the tape parallel to the floor all the way around. This is usually the single most important number for overall shirt fit, since it drives how the body of the shirt sits.
3. Waist
Measure around your natural waistline, generally the narrowest point of your torso, roughly at the level of your navel, not where your trousers currently sit if you wear them low or high. Keep the tape level and don’t pull it tight enough to compress your stomach.
4. Shoulder Width
With your arms relaxed at your sides, measure in a straight line across your back from the edge of one shoulder bone to the edge of the other (the point where your shoulder meets the top of your arm). This one is easiest to get accurately with a helper standing behind you, since it’s difficult to see or reach both shoulder points yourself.
5. Sleeve Length
Bend your arm slightly at the elbow (about the angle it naturally sits when relaxed). Measure from the edge of the shoulder bone, down the outside of the arm, over the elbow, to the point on your wrist where you’d want the shirt cuff to end. Keeping a slight bend in the elbow while measuring, rather than a fully straight arm, accounts for the extra fabric needed for comfortable movement.
6. Bicep
Measure around the fullest part of your upper arm, usually just below the armpit, with your arm relaxed and hanging naturally rather than flexed.
7. Wrist / Cuff
Wrap the tape around your wrist at the point where you’d want the shirt cuff to sit and fasten. If you like a slightly looser cuff for a watch or bracelet, measure with a little extra room and note that preference alongside the number.
8. Shirt Length (Back Length)
Have your helper measure from the base of your neck (the same point used for the neck measurement) straight down your back to wherever you’d like the shirt hem to end, typically somewhere between your hip bone and the bottom of your zipper fly, depending on whether you tuck the shirt in or wear it untucked.
Keep a written record of all eight numbers together, in the same units, before entering them into any order form, most fit issues in made-to-measure orders trace back to a single mistyped or mismatched figure rather than a genuinely bad measurement.
Why This Matters More for Custom Shirts Than Off-the-Rack
With an off-the-rack shirt, a measurement that’s slightly off just means you pick a different standard size and accept whatever compromise comes with it, maybe the shoulders fit but the sleeves run long, or the collar is right but the body is baggy. There’s no separate ‘measurement step’ because the manufacturer already made that decision for you, for an average body.
With a custom shirt, your measurements aren’t a filter for choosing between pre-made options, they’re the actual blueprint the shirt is cut from. That’s exactly why custom shirt measurements deserve more care than trying on a few sizes in a store. There’s no salesperson to catch an obviously wrong fit before it’s made; the numbers you submit are, quite literally, what you’ll be wearing.
An Easier Alternative: Measure a Shirt You Already Own
If you have a dress shirt that already fits you well, not too tight, not too loose, sleeves landing at the right spot on your wrist, you can measure the garment itself instead of your body for several of these figures. Lay the shirt flat on a table, smooth out any wrinkles, and measure:
- Chest: straight across, just under the armpits, then double the number (since the shirt is folded in half when laid flat).
- Shoulder width: straight across the back, from shoulder seam to shoulder seam.
- Sleeve length: from the shoulder seam down to the end of the cuff.
- Shirt length: from the collar seam at the back down to the hem.
This approach works well as a sanity check against your body measurements, but it isn’t a substitute for a genuinely well-fitting reference shirt, measuring a shirt that already doesn’t fit you properly will simply reproduce the same problem in your new custom order.
Common Measuring Mistakes to Avoid
- Pulling the tape too tight. This is the single most common error, and it quietly shrinks every number, leading to a shirt that fits tighter than intended.
- Measuring over a thick sweater or jacket. Always measure in a thin, close-fitting layer so the numbers reflect your actual body, not your outerwear.
- Guessing the shoulder measurement alone. This is the number people most often skip or estimate, but it has an outsized effect on how the rest of the shirt hangs, so it’s worth the extra effort of asking someone to help.
- Mixing centimetres and inches. Decide on one unit before you start and use it for every single measurement and every field on the order form.
- Measuring once and assuming it’s correct. A single reading can be off by more than you’d expect, always take two, and a third if they disagree.
How Kavoo Uses Your Measurements
Once you have your eight measurements recorded, ordering a custom shirt is simply a matter of entering them into our guided builder alongside your fabric and style choices. Our step-by-step dress shirt guide walks through the design side of the process, collar styles, cuff options, and fabric selection, once your measurements are ready. From there, you can build your shirt directly from the Men’s Root Collection or browse the full shop.
If anything about the fit isn’t quite right once your shirt arrives, our returns and support policy outlines how adjustments and remakes are handled.
Confirm current builder flow and whether measurement fields match this exact list (some builders group bicep/cuff differently) before publishing, so the guide matches the live order form exactly.
Frequently Asked Questions
How accurate do my measurements really need to be?
Aim for accuracy within about half a centimetre (a quarter inch) on each measurement. Made-to-measure patterns build in a small amount of wearing ease, so tiny variations won’t ruin the fit, but numbers off by more than a centimetre or two can noticeably change how the shirt sits.
Can I measure myself without any help?
Neck, waist, bicep, and wrist are reasonably easy to measure alone. Shoulder width, sleeve length, and shirt length are much more reliable with a second person, since they involve reaching around your own back or judging a straight line down your own arm.
What if my measurements change between now and when I reorder?
Weight changes, fitness routines, and simply time passing can all shift your measurements. It’s worth re-measuring before every new order rather than reusing old numbers, especially if it’s been more than six months to a year since you last measured.
Should I measure over bare skin or a thin shirt?
A thin, close-fitting shirt (like a plain cotton t-shirt) is ideal. It reflects what you’ll actually be wearing under the finished shirt without adding the bulk of a sweater or jacket.
I don’t have a tape measure, can I use a piece of string?
Yes, as a backup: wrap a piece of non-stretch string or ribbon around the relevant area, mark or pinch where it meets, then lay it flat against a ruler or yardstick to read the length. It’s slightly less convenient than a proper tape measure but works in a pinch.
Final Thoughts
Learning how to measure shirt size properly is the one step in ordering a custom shirt that pays off every time you wear it afterward. It takes a few extra minutes upfront, but it’s the difference between a shirt that simply exists in your closet and one you reach for every week because it actually fits the way it’s supposed to.
Once your measurements are ready, you can start building your first custom shirt through Kavoo’s custom clothing collections.
How to Measure Yourself for a Custom Shirt at Home
The single biggest factor in whether a custom shirt actually fits you is not the fabric, the collar style, or the brand you order from, it’s the accuracy of the measurements you submit. Get them right, and a made-to-measure shirt will sit closer to your body and feel noticeably different from anything off a store rack. Get them wrong by even an inch, and you can end up with the same fit problems you were trying to avoid in the first place.
The good news is that learning how to measure shirt size at home takes about ten minutes, a tape measure, and one other person to help. This guide walks through exactly what to measure, how to measure it correctly, and the mistakes that trip people up most often, so your first custom shirt order fits the way it’s supposed to.
What You’ll Need Before You Start
- A flexible fabric or vinyl tape measure, not a rigid metal one, which won’t wrap around the body accurately.
- A well-fitting dress shirt you already own (optional, but useful as a cross-check).
- A friend or family member to help. Self-measuring works for some steps, but shoulder width and back length are almost impossible to get accurately by yourself.
- A mirror, so you can confirm the tape is level and sitting where it should.
- About 10–15 minutes, ideally wearing a thin, well-fitting shirt (like a plain t-shirt) rather than a bulky sweater.
Before You Begin: A Few Ground Rules
A handful of small habits make the difference between measurements you can trust and measurements that quietly throw off your entire order:
- Stand naturally, with your normal posture. Don’t puff your chest out or suck your stomach in, the shirt has to fit you standing, sitting, and moving normally, not in a held pose.
- Breathe normally while the tape is being placed. Measuring right after a deep inhale will make your chest and waist numbers larger than they really are.
- Keep the tape snug against the body, but not pulled tight enough to compress the skin or fabric underneath. A good rule of thumb: you should be able to slide one finger flat between the tape and your body.
- Measure twice for every number. If the two readings don’t match within about half a centimetre (roughly a quarter inch), measure a third time and use the middle value.
- Record every measurement in the same unit (centimetres or inches), don’t mix units partway through, since that’s a common source of order errors.
Step-by-Step: The Core Shirt Measurements
1. Neck
Wrap the tape around the base of your neck, at the point where a shirt collar would naturally sit, roughly where your neck meets your shoulders, just above the collarbone. Keep one finger between the tape and your neck for a comfortable-but-accurate reading, since a collar measured too tight will feel restrictive all day.
2. Chest
Wrap the tape around the fullest part of your chest, going under your arms and across your shoulder blades, keeping the tape parallel to the floor all the way around. This is usually the single most important number for overall shirt fit, since it drives how the body of the shirt sits.
3. Waist
Measure around your natural waistline, generally the narrowest point of your torso, roughly at the level of your navel, not where your trousers currently sit if you wear them low or high. Keep the tape level and don’t pull it tight enough to compress your stomach.
4. Shoulder Width
With your arms relaxed at your sides, measure in a straight line across your back from the edge of one shoulder bone to the edge of the other (the point where your shoulder meets the top of your arm). This one is easiest to get accurately with a helper standing behind you, since it’s difficult to see or reach both shoulder points yourself.
5. Sleeve Length
Bend your arm slightly at the elbow (about the angle it naturally sits when relaxed). Measure from the edge of the shoulder bone, down the outside of the arm, over the elbow, to the point on your wrist where you’d want the shirt cuff to end. Keeping a slight bend in the elbow while measuring, rather than a fully straight arm, accounts for the extra fabric needed for comfortable movement.
6. Bicep
Measure around the fullest part of your upper arm, usually just below the armpit, with your arm relaxed and hanging naturally rather than flexed.
7. Wrist / Cuff
Wrap the tape around your wrist at the point where you’d want the shirt cuff to sit and fasten. If you like a slightly looser cuff for a watch or bracelet, measure with a little extra room and note that preference alongside the number.
8. Shirt Length (Back Length)
Have your helper measure from the base of your neck (the same point used for the neck measurement) straight down your back to wherever you’d like the shirt hem to end, typically somewhere between your hip bone and the bottom of your zipper fly, depending on whether you tuck the shirt in or wear it untucked.
Keep a written record of all eight numbers together, in the same units, before entering them into any order form, most fit issues in made-to-measure orders trace back to a single mistyped or mismatched figure rather than a genuinely bad measurement.
Why This Matters More for Custom Shirts Than Off-the-Rack
With an off-the-rack shirt, a measurement that’s slightly off just means you pick a different standard size and accept whatever compromise comes with it, maybe the shoulders fit but the sleeves run long, or the collar is right but the body is baggy. There’s no separate ‘measurement step’ because the manufacturer already made that decision for you, for an average body.
With a custom shirt, your measurements aren’t a filter for choosing between pre-made options, they’re the actual blueprint the shirt is cut from. That’s exactly why custom shirt measurements deserve more care than trying on a few sizes in a store. There’s no salesperson to catch an obviously wrong fit before it’s made; the numbers you submit are, quite literally, what you’ll be wearing.
An Easier Alternative: Measure a Shirt You Already Own
If you have a dress shirt that already fits you well, not too tight, not too loose, sleeves landing at the right spot on your wrist, you can measure the garment itself instead of your body for several of these figures. Lay the shirt flat on a table, smooth out any wrinkles, and measure:
- Chest: straight across, just under the armpits, then double the number (since the shirt is folded in half when laid flat).
- Shoulder width: straight across the back, from shoulder seam to shoulder seam.
- Sleeve length: from the shoulder seam down to the end of the cuff.
- Shirt length: from the collar seam at the back down to the hem.
This approach works well as a sanity check against your body measurements, but it isn’t a substitute for a genuinely well-fitting reference shirt, measuring a shirt that already doesn’t fit you properly will simply reproduce the same problem in your new custom order.
Common Measuring Mistakes to Avoid
- Pulling the tape too tight. This is the single most common error, and it quietly shrinks every number, leading to a shirt that fits tighter than intended.
- Measuring over a thick sweater or jacket. Always measure in a thin, close-fitting layer so the numbers reflect your actual body, not your outerwear.
- Guessing the shoulder measurement alone. This is the number people most often skip or estimate, but it has an outsized effect on how the rest of the shirt hangs, so it’s worth the extra effort of asking someone to help.
- Mixing centimetres and inches. Decide on one unit before you start and use it for every single measurement and every field on the order form.
- Measuring once and assuming it’s correct. A single reading can be off by more than you’d expect, always take two, and a third if they disagree.
How Kavoo Uses Your Measurements
Once you have your eight measurements recorded, ordering a custom shirt is simply a matter of entering them into our guided builder alongside your fabric and style choices. Our step-by-step dress shirt guide walks through the design side of the process, collar styles, cuff options, and fabric selection, once your measurements are ready. From there, you can build your shirt directly from the Men’s Root Collection or browse the full shop.
If anything about the fit isn’t quite right once your shirt arrives, our returns and support policy outlines how adjustments and remakes are handled.
Confirm current builder flow and whether measurement fields match this exact list (some builders group bicep/cuff differently) before publishing, so the guide matches the live order form exactly.
Frequently Asked Questions
How accurate do my measurements really need to be?
Aim for accuracy within about half a centimetre (a quarter inch) on each measurement. Made-to-measure patterns build in a small amount of wearing ease, so tiny variations won’t ruin the fit, but numbers off by more than a centimetre or two can noticeably change how the shirt sits.
Can I measure myself without any help?
Neck, waist, bicep, and wrist are reasonably easy to measure alone. Shoulder width, sleeve length, and shirt length are much more reliable with a second person, since they involve reaching around your own back or judging a straight line down your own arm.
What if my measurements change between now and when I reorder?
Weight changes, fitness routines, and simply time passing can all shift your measurements. It’s worth re-measuring before every new order rather than reusing old numbers, especially if it’s been more than six months to a year since you last measured.
Should I measure over bare skin or a thin shirt?
A thin, close-fitting shirt (like a plain cotton t-shirt) is ideal. It reflects what you’ll actually be wearing under the finished shirt without adding the bulk of a sweater or jacket.
I don’t have a tape measure, can I use a piece of string?
Yes, as a backup: wrap a piece of non-stretch string or ribbon around the relevant area, mark or pinch where it meets, then lay it flat against a ruler or yardstick to read the length. It’s slightly less convenient than a proper tape measure but works in a pinch.
Final Thoughts
Learning how to measure shirt size properly is the one step in ordering a custom shirt that pays off every time you wear it afterward. It takes a few extra minutes upfront, but it’s the difference between a shirt that simply exists in your closet and one you reach for every week because it actually fits the way it’s supposed to.
Once your measurements are ready, you can start building your first custom shirt through Kavoo’s custom clothing collections.